In 2013, Chris Reynolds opened his PayPal account to find a staggering $92 quadrillion balance. The error was due to a defect in PayPal’s programming. PayPal quickly fixed the problem, and Mr. Reynolds’ account returned to its previous state.
Software defects like that are not rare. As small (what may seem insignificant) error can cause a large deviation from the expected result, and they can happen any time a feature does not work the way it’s supposed to.
So, how do these problems crop up if every company engages in software testing with a testing team? The reality is, it can be challenging to resolve every single error. And, while most defects are minor, some can be devastating for the business.
The best way to prevent potential defects and resolve errors quickly is to employ a proper defect management process. Let’s look at some of the best practices for implementing a defect management and defect resolution process.
What Is Defect Management?
A defect in software development represents a deviation from the user’s or the business’s requirements. It could be an error in coding, which the test team can detect while designing and executing test cases and the review process.
There are some defects that the testing team might miss during the development process. In this case, software is released ‘into the wild’ and users then report the defects discovered. In any case, whether defects are discovered prior to or after release, the company fixes the errors through a defect management process.
Defect management refers to the systematic process of software testing to identify and fix defects or bugs, and then verify that they have been fixed correctly. This process helps in defect prevention and defect resolution, and it’s critical to ensuring software performs as it should.
A typical defect management life cycle looks like this:
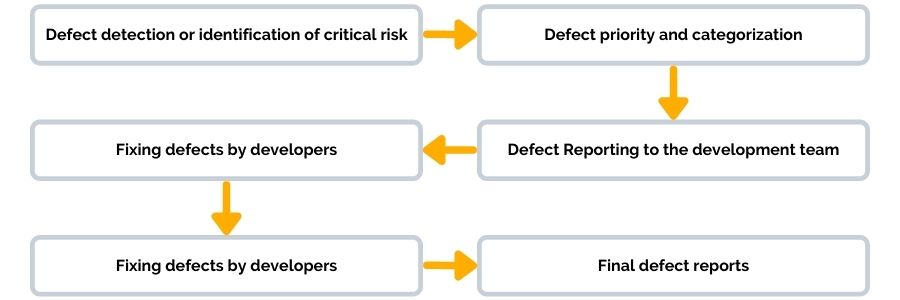
During the defect life cycle, test teams employ various software tools or defect management tools that help in process improvement and making defect fixes more efficient.
But one of the most crucial parts of a controlled defect life cycle happens at the beginning—during the initial defect discovery and reporting phase. The rest of the software development life cycle and quality assurance (QA) process are smooth and efficient when these steps are done well.
6 Best Practices for Successful Defect Management Reporting
Proper defect reporting allows software development teams to understand a critical risk and employ different automation tools for efficient defect removal and fixing. When done well, the defects reported improve communication and allow for quicker defect resolution.
But what does a good defect report look like in the defect management process? Here are six best practices that test teams can use to create a good defect report.
1. Properly Describe the Issue
So you’ve just stumbled upon a defect during software testing! The first step is to document the issue and describe it in detail in the defect report. The better your description of the problem is, the smoother the defect management process will be.
Describe the number of defects you have encountered and what each particular defect entails. You can answer questions such as:
- What is the issue?
- When does it happen?
An example can be “Error occurs after clicking the load button on the home page.” The testing team should understand the defect from a simple and concise description. “What and When” sound like simple questions, but if you are a developer, think about how much detail you need to understand in order to fix the defect? You’ll need to know what platform, what data is used, what configuration, etc. They can then take steps to fix it during the QA process.
2. Explain Where the Defect Is Happening
Once you have described the defect, outline where the problem is happening. There should be a drop-down list within your defect management system where you can select whether the defect is happening within your operating system, in the browser, database, application server, or somewhere else.
Since every software is unique, the possible locations will vary. Your company can modify the list of places where a defect could occur to suit your software.
There are a few types of defects you might encounter and report to the development team:
- User Interface (UI) defects are usually cosmetic defects, such as overlapping text, misspelled text, error messages with the wrong color, and misaligned button controls.
- Functional defects happen when the software does not perform as expected, such as when the user cannot create an account, book an appointment, download a free trial, or complete another action.
- Database defects are usually located within the software application database, where companies store, manage, retrieve, and validate data. Defects could be a failure in connection to the backend database, incorrect SQL code, or other issues.
- Integration defects occur when two or more components of a piece of software do not communicate well with each other or have an inaccurate data flow.
- Architectural defects occur when key relationships, connections, or software components are inaccurate or flawed. These are the most costly and time-consuming defects to fix. You can help avoid them by adequately mapping the high-level and low-level architecture of the software.
3. Assign Priority and Severity of the Defect
During the testing phase, you might discover a critical defect that requires immediate attention. In other cases, you will only run into minor defects, which might not diminish the user experience but could result in a damaged brand reputation.
Testing teams should use defect categorization or defect status to denote severity and priority. Doing this enables the development team to distinguish the urgency of fixing a certain defect.
Severity implies the magnitude of a defect’s impact or how serious it is, while priority shows how quickly the development team needs to address it. Higher-priority defects must be addressed immediately, while lower-priority defects can wait.
Every testing team has a different way of doing defect tracking and categorization. At XBOSoft, our standards for priority and severity are as follows.
| Severity Level | Description |
|---|---|
| Blocker | System crash, mission functionality |
| Critical | Data loss, security issues |
| Major | Website hangs, script errors |
| Normal | UI issues, small functional issues |
| Minor | Cosmetic Problems |
| Priority Level | Description |
|---|---|
| P1-Urgent | Defects are urgent and need to be fixed immediately. |
| P2-High | Defects must be resolved in this release. |
| P3-Medium | Defects should be fixed, but do not hold shipment for them. |
| P4-Low | Defects are present but can be deferred to the next release. |
An example of a high priority and low severity defect is the company logo not being correctly displayed.
A low priority and high severity defect example is an application crash whenever the user enters 1,500+ characters in a name test box that should otherwise not accept more than 60 characters.
Outlining the priority and severity of the defect provides valuable defect metrics to the software development and software testing team. This information enables them to tackle the important defects early, so they can create a more valuable customer experience.
Outline the Steps to Reproduce the Defect
After ensuring that the software team understands what the defect is, where and when it is occurring, and how important it is, you should also outline steps on how they can reproduce the defect. This will help them understand it better and compare it to a defect-free functionality.
Write what steps they should take within the software in short sentences and illustrate the sequence of action. Try to start each sentence with a verb and make sure to write in a concise manner.
Here’s an example of how to outline the steps:
- Select “File” from menu bar
- Click “Open” from the pop-up dialog box
Describe and Compare the Actual Result with the Expected Result
To make it easier for the team to understand the software defect, you should also compare the actual result (the defect) with the expected result (what should normally happen).
Write two sentences marked Actual Result and Expected Result so that the software team knows what the use case and business requirements around the defective feature are. An example of how to do this step is:
- Actual Result: An error message “Unknown error” pops up
- Expected Result: Load File dialog box pops up
Add Any Additional Information and Comments
Finally, add additional information and comments to make the defect management cycle easier and to enable the team to better understand the defect logged.
This info could include any details from the test manager, different test cases that were performed, and the detect workflow used. Examples of additional information are:
- Long file, testing data file, or anything else that can help developers fix the defect
- Other environments where you have not seen the defect before, for example: the defect occurs in Mac OS 10.6.1 but not in 10.7
Additional information helps save time and improves communication between the quality assurance and the development team.
Conclusion
Accurate defect reports can help decrease the defect leakage ratio (those defects that are found by your customers or end-users) and fix defects in the early stage. These reports make the process of testing and quality assurance more efficient and increase the quality of your products.
If you’re looking to strengthen your defect lifecycle and make your team stronger, consider working with XBOSoft.
XBOSoft offers high-quality testing and quality assurance services designed to complement your in-house development needs. Our deep expertise ensures that you have a well-developed product that your users appreciate. Contact us today and start your journey toward defect-free software.
Leave A Comment